
Views: 0 Author: Site Editor Publish Time: 2026-09-23 Origin: Site
Shoulder arthroscopy is a minimally invasive surgical technique used to diagnose and treat a wide range of glenohumeral and subacromial disorders. Common indications include rotator cuff tears, labral injuries, shoulder instability, biceps pathology, cartilage lesions, subacromial impingement, synovitis, and selected degenerative conditions.
Compared with open shoulder surgery, arthroscopy provides direct visualization of the glenohumeral joint and subacromial space through small portals. However, successful shoulder arthroscopy requires detailed knowledge of shoulder anatomy, appropriate patient positioning, accurate portal placement, controlled fluid management, and a systematic diagnostic examination.
This article presents a step-by-step overview of shoulder arthroscopy surgical technique, including preoperative planning, beach-chair and lateral decubitus positioning, standard posterior and anterior portals, arthroscope insertion, diagnostic glenohumeral examination, and subacromial bursoscopy.
Shoulder arthroscopy may be considered when symptoms persist despite appropriate nonoperative treatment and clinical findings are consistent with an intra-articular or subacromial disorder.
Common indications include:
Rotator cuff tears
Shoulder instability
Bankart lesions
SLAP lesions
Labral tears
Long head of biceps pathology
Subacromial impingement
Synovitis
Chondral lesions
Loose bodies
Selected acromioclavicular joint disorders
Adhesive capsulitis requiring operative treatment
Selected degenerative shoulder conditions
The decision to perform arthroscopy should be based on the patient's symptoms, physical examination, imaging findings, functional limitations, and response to conservative treatment.
Careful preoperative planning is essential before entering the operating room.
The surgeon should review:
Mechanism of injury
Duration and characteristics of symptoms
Shoulder instability
Range of motion
Rotator cuff strength
Neurological findings
Previous shoulder surgery
Previous dislocation or trauma
Response to conservative treatment
Imaging should be reviewed to identify the suspected pathology and determine whether additional arthroscopic instruments or implants may be required.
Depending on the clinical indication, imaging may include:
Plain radiographs
Ultrasound
MRI
MR arthrography
CT in selected cases
The equipment required depends on the planned procedure.
A typical shoulder arthroscopy setup may include:
Arthroscopy tower and high-definition monitor
Arthroscopy pump or irrigation system
30° arthroscope
70° arthroscope when required
Arthroscopic cannulas
Trocar and blunt obturator
Spinal needles for portal localization
Arthroscopic probe
Graspers
Scissors
Basket punches
Motorized shaver
Burrs
Suture-passing devices
Suture anchors
Radiofrequency or electrosurgical devices when appropriate
Patient positioning system
Arm holder or traction system
The surgeon should ensure that the required implants and instruments are available before surgery, particularly when preoperative imaging indicates possible labral repair, rotator cuff repair, biceps procedures, or bone work.
Before arthroscopy begins, an examination under anesthesia can provide important information about shoulder mobility and stability.
The surgeon may assess:
Forward elevation
External rotation
Internal rotation
Abduction
Anterior translation
Posterior translation
Inferior translation
Multidirectional laxity
Comparing the operative shoulder with the contralateral side can help identify instability or abnormal capsular laxity.
This assessment can be particularly useful in patients undergoing surgery for shoulder instability.
Two principal positions are commonly used:
Beach-chair position
Lateral decubitus position
Both have specific advantages and limitations.
In the beach-chair position, the patient's torso is elevated and the head is carefully supported.
The operating table and head support should allow adequate exposure of:
The posterior shoulder
Lateral shoulder
Anterior shoulder
Entire upper extremity
A specialized arm holder can be used to maintain the arm in a selected position without requiring continuous manual assistance.
Convenient access to the shoulder
Easy conversion between arthroscopic and open procedures
Useful for shoulder replacement and arthroscopic procedures
Allows relatively unrestricted movement of the arm
Familiar orientation for many surgeons
However, blood pressure management and cerebral perfusion are important considerations when the patient is positioned upright. Appropriate anesthesia monitoring is essential.
In the lateral decubitus position, the patient lies on the nonoperative side.
Padding should be placed carefully beneath pressure-sensitive areas, including:
Axilla
Pelvis
Knees
Ankles
Elbows
The operative arm is positioned in an arm holder and may be abducted with controlled traction.
A commonly described setup uses approximately:
70° of shoulder abduction
15–20° of forward flexion
Controlled longitudinal traction
The exact position and traction force should be individualized.
The purpose of traction is to increase the glenohumeral working space rather than to apply excessive force.
The lateral decubitus position can provide:
Good visualization of the glenohumeral joint
Increased joint distraction
Convenient access to the posterior shoulder
Useful orientation for certain instability procedures
Potential disadvantages include traction-related neurological complications and the need for careful positioning and padding.
The entire operative shoulder and upper extremity should be prepared to allow unrestricted access.
The prepared field should generally include:
Clavicle
Acromion
Scapular spine
Acromioclavicular joint
Coracoid process
Shoulder
Upper arm
Forearm
Hand
Adequate draping allows the surgeon to move between posterior, anterior, lateral, and accessory portals during the procedure.
A fluid-resistant U-shaped drape can help contain irrigation fluid and reduce pooling around the patient.
Before establishing portals, important bony landmarks should be identified and marked.
These include:
Clavicle
Anterior border of the acromion
Posterior border of the acromion
Lateral edge of the acromion
Acromioclavicular joint
Scapular spine
Coracoid process
All potential portals should be marked before the arthroscope is inserted.
The three basic portals used for diagnostic shoulder arthroscopy are:
Posterior portal
Anterior portal
Lateral portal
Additional accessory portals can be created depending on the pathology and procedure.
The posterior portal is commonly the first portal established for diagnostic glenohumeral arthroscopy.
The typical location is approximately 2–3 cm inferior and slightly medial to the posterolateral corner of the acromion, corresponding to the soft spot between the posterior deltoid and the underlying rotator cuff.
The precise location should be adjusted according to the patient's anatomy.
Identify the posterolateral corner of the acromion.
Palpate the soft spot over the posterior glenohumeral joint.
Make a small skin incision.
Introduce a blunt trocar and cannula toward the glenohumeral joint.
Confirm entry into the joint.
Insert the arthroscope.
A spinal needle can be used for localization when necessary.
The skin incision should be controlled and the trocar should be advanced carefully to minimize the risk of injury to the cartilage or neurovascular structures.
After establishing the posterior portal, the arthroscope is introduced into the glenohumeral joint.
The irrigation pump is then activated.
The first structures used for orientation commonly include:
Humeral head
Glenoid
Long head of the biceps tendon
Rotator cuff
The surgeon should first confirm that the arthroscope is correctly positioned before creating additional portals.
Some surgeons inject sterile saline into the joint through a spinal needle before portal establishment. This can distend the joint and confirm intra-articular access.
The anterior portal is created under direct arthroscopic visualization.
Two commonly used methods are:
Inside-out technique
Outside-in technique
The choice depends on the intended procedure and surgeon preference.
With the arthroscope positioned in the posterior portal, the surgeon identifies the desired anterior portal from inside the joint.
The arthroscope is positioned near the rotator interval and anterior capsule.
A long switching rod can then be advanced through the cannula and used to tent the anterior skin.
A small incision is made at the point where the rod elevates the skin.
A cannula can then be introduced over the switching rod into the joint.
The inside-out approach allows direct visualization of the intended intra-articular trajectory.
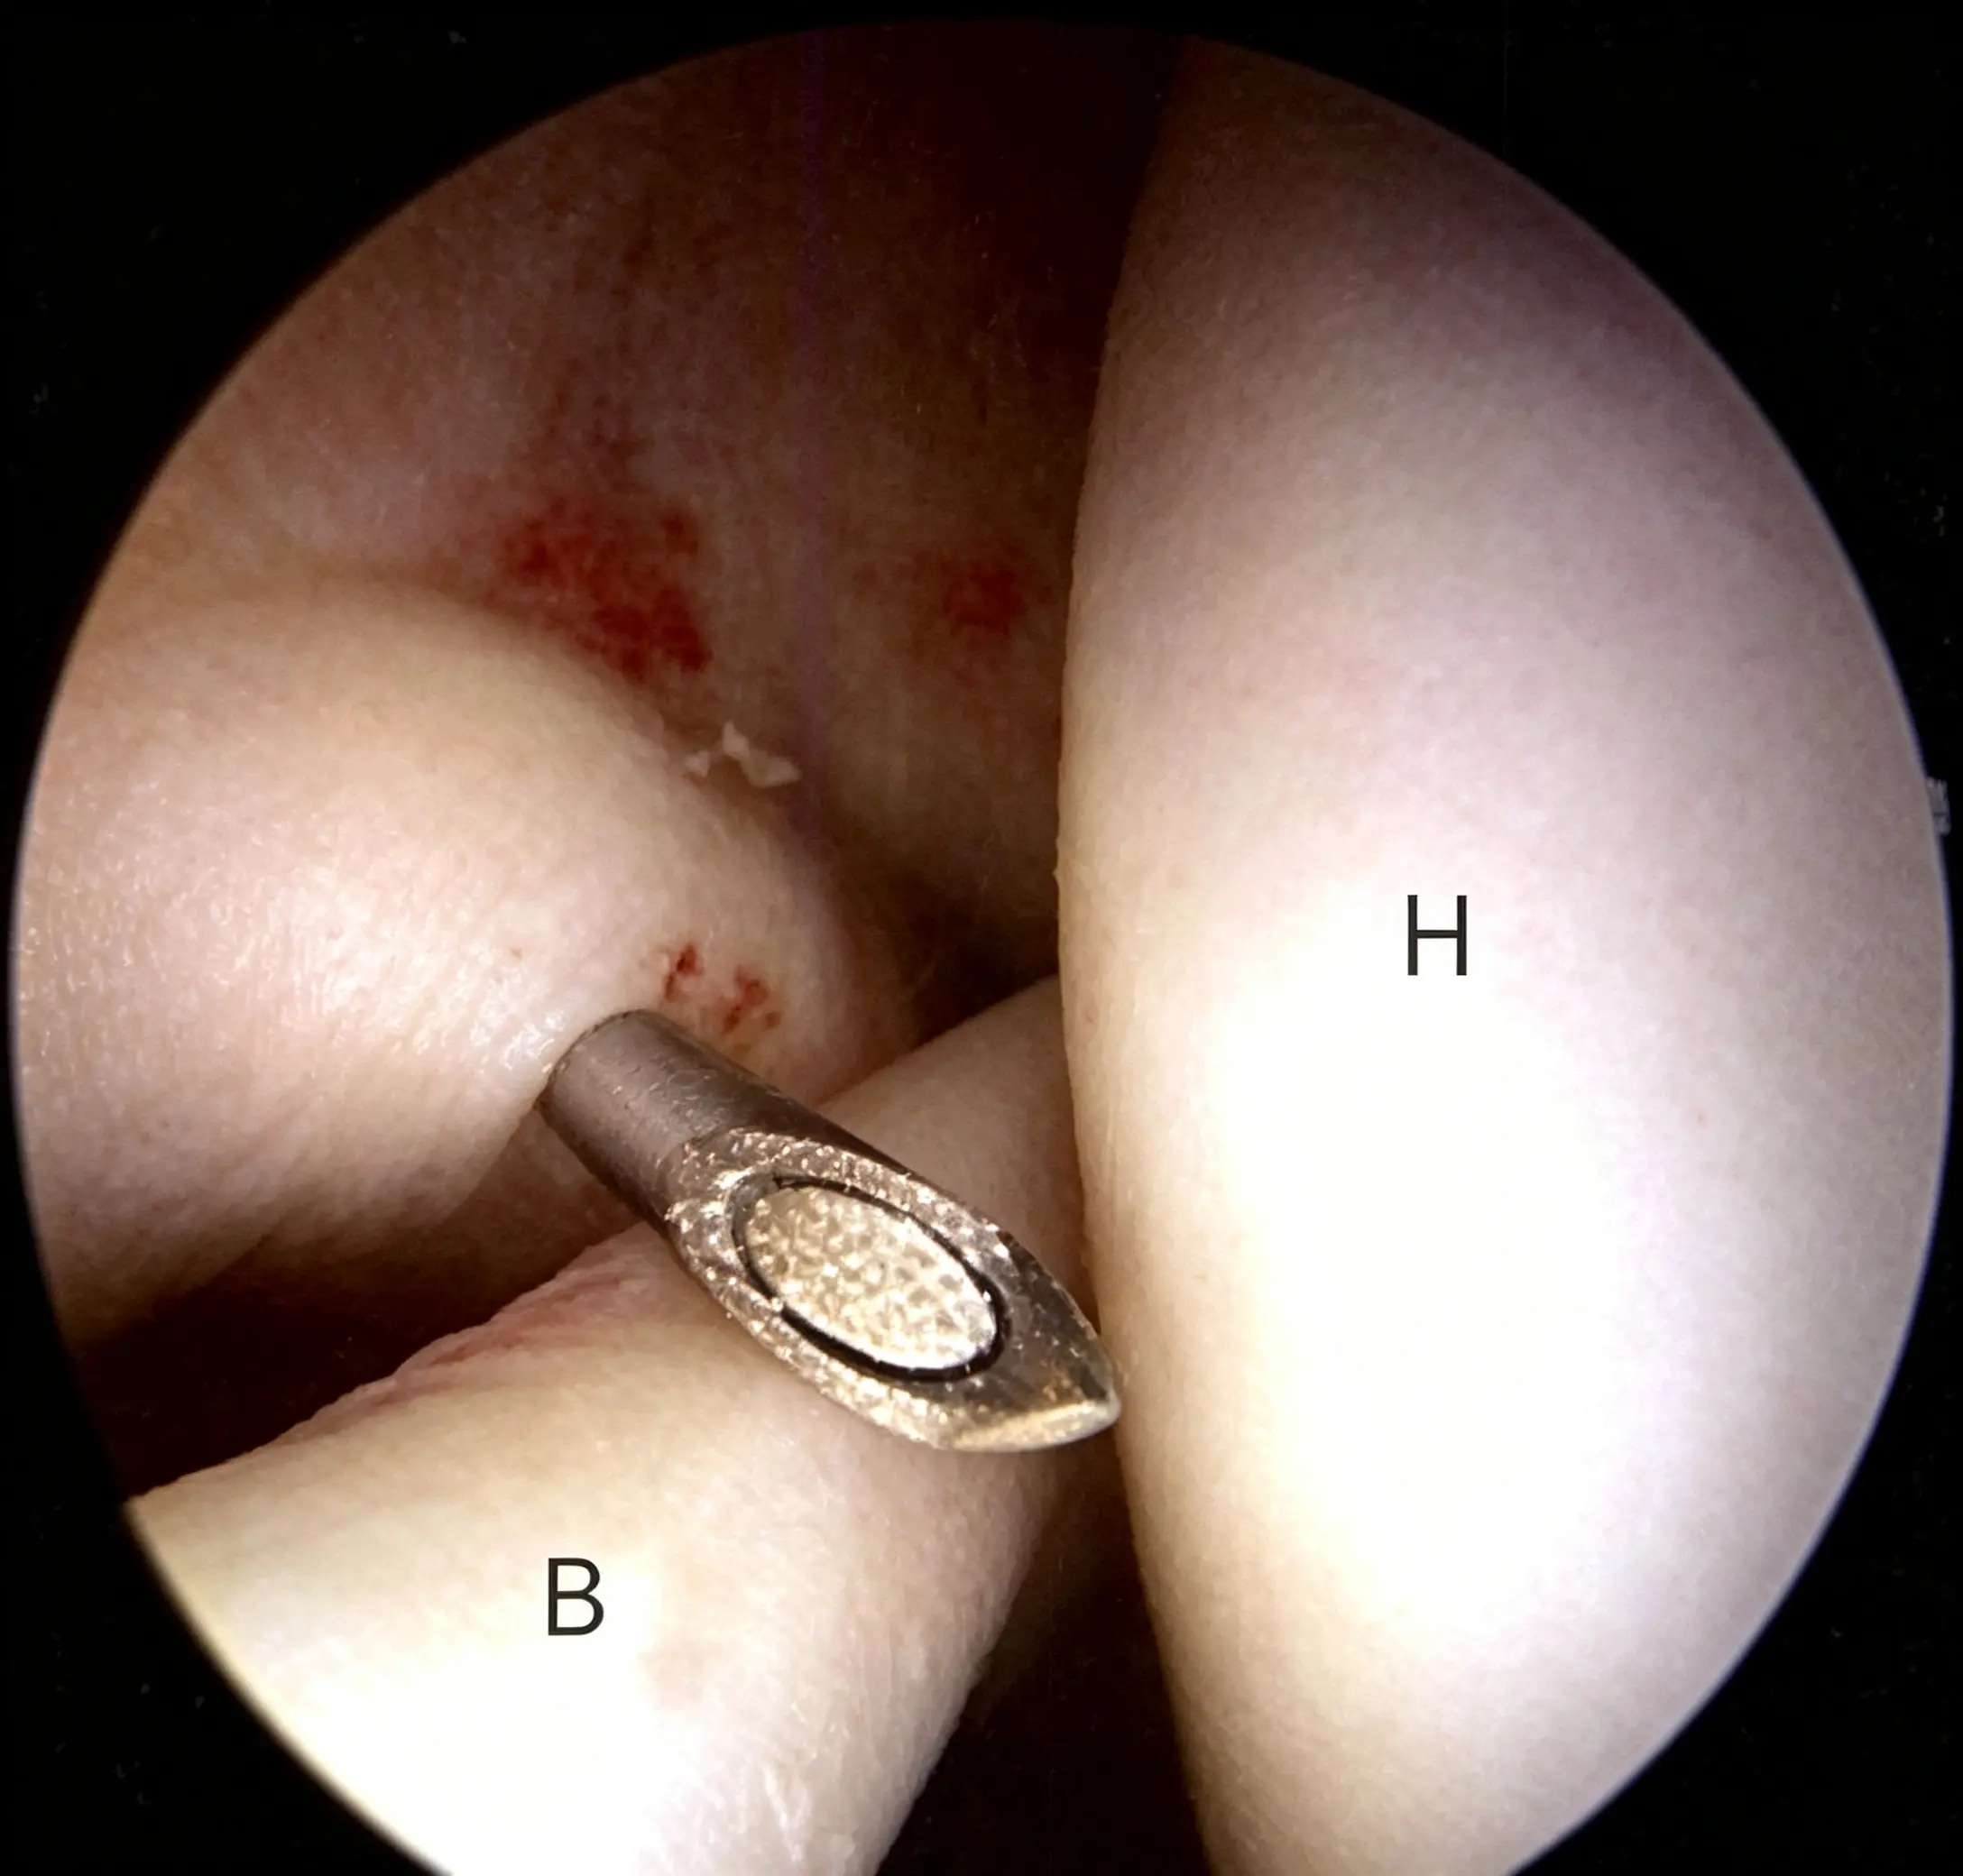
▲ A lumbar puncture needle is passed through the rotator interval to establish a correct anterosuperior portal, allowing clear identification of the humeral head (H) and the long head of the biceps tendon (B).
The outside-in technique uses a spinal needle to determine the appropriate portal location.
The needle is inserted through the skin toward the intended intra-articular target under direct arthroscopic visualization.
The surgeon confirms:
Needle trajectory
Desired working position
Distance from the biceps tendon
Relationship to the rotator interval
Avoidance of neurovascular structures
After confirming the correct position:
Remove the spinal needle.
Make a small skin incision.
Introduce the cannula and obturator.
Advance through the capsule under direct visualization.
The outside-in technique is particularly useful when the exact portal location needs to be tailored to the pathology.
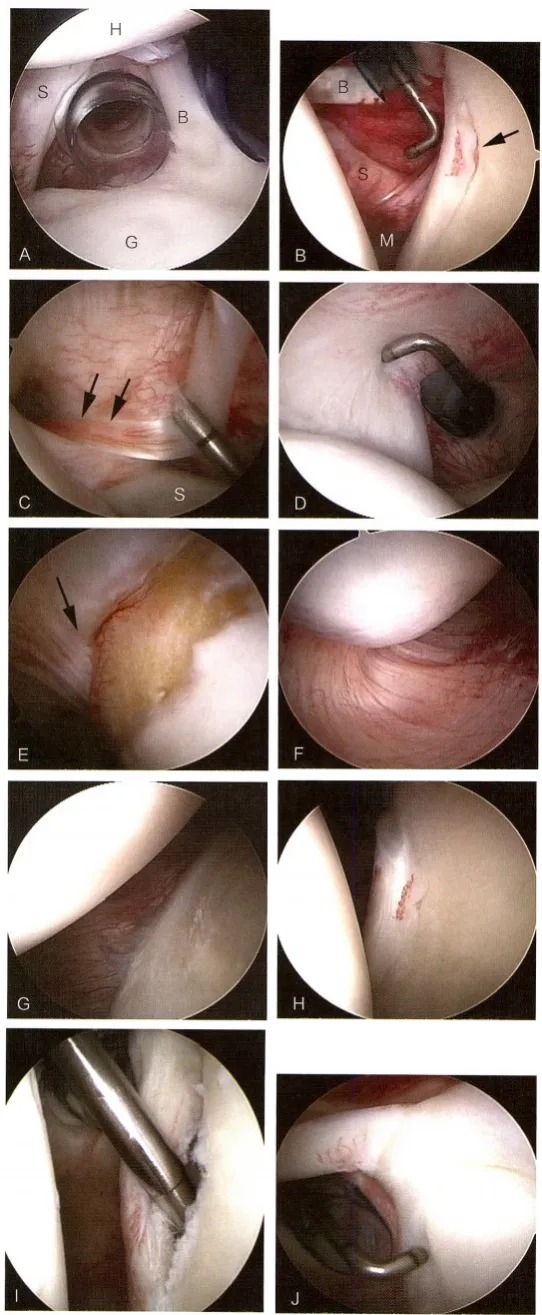
▲ A. In the lateral decubitus position, an anterosuperior and an anteroinferior portal are established in the left shoulder, with the biceps tendon (B) located between the two cannulas. The humeral head (H), glenoid (G), and the superior border of the subscapularis (S) are identified; B. In the beach chair position, left shoulder, the subscapularis, biceps tendon, and middle glenohumeral ligament (M) are identified. The anterosuperior labrum has multiple variations and here appears as an inferolateral hole (arrow). C. The long head of the biceps tendon can be pulled back into the joint cavity to examine for synovitis (arrow). D. The anterior border of the supraspinatus and the normal rotator cuff insertion are explored. E. When the arthroscope is advanced posteriorly along the rotator cuff, the bare area of the humeral head can be seen, which is a normal area lacking articular cartilage. The transition zone between the posterior rotator cuff and the inferior joint capsule is identified (arrow). F. The inferior joint capsule attaches to the humerus, and this area is the most likely site for detecting loose bodies (beach chair position). G. When the arthroscope is returned superiorly, the inferior labrum can be seen. H, I. The attachment of the anterior labrum is examined. H. The attachment of the labrum and joint capsule is normal. I. Tear of the anteroinferior labral attachment (Bankart lesion). J. The attachment point of the superior labrum is explored.
A systematic examination is essential.
The surgeon should avoid focusing only on the suspected lesion. A complete diagnostic arthroscopy can identify associated injuries that may not have been apparent on preoperative imaging.
A typical examination evaluates:
Humeral head
Glenoid cartilage
Subscapularis tendon
Rotator interval
Superior and middle glenohumeral ligaments
Long head of biceps tendon
Superior labrum
Rotator cuff undersurface
Inferior capsule
Inferior glenohumeral ligament
Anterior labrum
Posterior labrum
Posterior capsule
Biceps anchor
Subscapular recess
The articular surfaces should be carefully inspected for:
Cartilage defects
Fibrillation
Flaps
Full-thickness cartilage loss
Focal chondral lesions
Degenerative changes
The central glenoid may show areas of relatively thin cartilage that can represent normal anatomical variation rather than pathological cartilage loss.
The surgeon should therefore interpret cartilage appearance in the context of patient age, location, symptoms, and the overall joint examination.
The superior portion of the subscapularis tendon should be examined carefully.
The surgeon evaluates:
Tendon continuity
Tendon attachment to the lesser tuberosity
Partial-thickness tearing
Tendon quality
Retraction
Associated biceps pathology
The rotator interval is the region between the anterior supraspinatus and superior subscapularis.
It contains important capsuloligamentous structures and the long head of the biceps tendon.
The quality and tension of the rotator interval should be assessed, particularly in patients with instability or stiffness.
The superior glenohumeral ligament (SGHL) and middle glenohumeral ligament (MGHL) should be evaluated.
These structures are located around the anterior shoulder capsule and rotator interval.
Anatomical variations are common.
One important variant is the Buford complex, characterized by a cord-like MGHL associated with an absent or markedly hypoplastic anterosuperior labrum.
Recognizing such variants is important because they should not automatically be interpreted as pathological labral lesions.
The long head of the biceps tendon should be examined throughout its intra-articular course.
The surgeon evaluates:
Tendon appearance
Synovitis
Fraying
Partial tearing
Instability
Biceps anchor
Relationship with the superior labrum
The tendon can be gently manipulated to inspect areas that may otherwise be difficult to visualize.
Biceps pathology frequently coexists with labral and rotator cuff disorders and should therefore be assessed systematically.
The superior labrum should be examined around the attachment of the long head of the biceps tendon.
The surgeon evaluates:
Stability of the biceps anchor
Labral attachment
Fraying
Detachment
Extension of a tear anteriorly or posteriorly
A SLAP lesion should not be diagnosed solely on the basis of a superior labral variant.
Normal anatomical variations, including a mobile or meniscoid superior labrum, can resemble pathology.
Therefore, assessment should incorporate:
Patient age
Symptoms
Physical examination
Labral appearance
Stability of the biceps anchor
Preoperative imaging
The articular surface of the rotator cuff should be inspected from inside the glenohumeral joint.
The surgeon evaluates:
Supraspinatus
Infraspinatus
Subscapularis
Teres minor when visible
Tendon attachment
Partial-thickness tears
Full-thickness defects
Internal and external rotation of the arm can improve visualization of the posterior and superior cuff.
The normal bare area of the humeral head should also be recognized.
This is an area of relatively absent articular cartilage and should not automatically be mistaken for a chondral lesion.
The inferior joint capsule and axillary recess should be inspected.
The surgeon evaluates:
Capsular redundancy
Synovitis
Capsular attachment
Humeral-sided ligament abnormalities
Loose bodies
Inferior labral pathology
A humeral-sided avulsion of the inferior glenohumeral ligament may occur with or without an associated bony fragment.
These lesions can be important in patients with traumatic shoulder instability.
The anterior band of the inferior glenohumeral ligament (IGHL) is a major static stabilizer against anterior translation of the humeral head, particularly in the abducted and externally rotated shoulder.
The anterior-inferior labrum should normally remain firmly attached to the glenoid rim.
Detachment may indicate a:
Bankart lesion
Perthes lesion
Anterior labral tear
Capsulolabral injury
The surgeon should evaluate the quality and tension of the capsulolabral complex.
When the capsule and ligaments are excessively lax, the arthroscope may pass unusually easily between the humeral head and glenoid.
This is commonly referred to as the drive-through sign.
A pronounced drive-through sign can indicate increased capsular laxity or multidirectional instability in the appropriate clinical setting.
However, the finding should not be interpreted in isolation. Some degree of capsular mobility is normal, and the diagnosis of multidirectional instability requires correlation with the patient's clinical history and examination.
After completing the anterior and inferior examination, the arthroscope can be transferred to the anterior portal.
This provides a different viewing angle for evaluating the posterior glenoid.
The posterior labrum should be assessed for:
Detachment
Fraying
Cysts
Instability
Posterior capsular abnormalities
The posterior capsule and posterior band of the inferior glenohumeral ligament should also be inspected.
From the anterior viewing position, the surgeon can further evaluate:
Subscapularis recess
Superior subscapularis tendon
Long head of the biceps tendon
Biceps pulley
Biceps groove
Synovial tissue
Occasionally, loose bodies or inflammatory tissue may be present within the subscapular recess.
The biceps tendon should be assessed for stability as well as structural integrity.
After completing the glenohumeral examination, the surgeon may enter the subacromial space.
This portion of the procedure is often called subacromial bursoscopy.
The cannula is introduced toward the posterior aspect of the acromion and advanced parallel to the undersurface of the acromion.
Once the cannula enters the subacromial bursa, irrigation and visualization can expand the working space.
A lateral portal may then be established according to the planned procedure.
The surgeon should systematically inspect:
Subacromial bursa
Undersurface of the acromion
Coracoacromial ligament
Acromial morphology
Anterior acromial region
Lateral acromion
Greater tuberosity
Rotator cuff
The presence of:
Synovitis
Bursal hypertrophy
Adhesions
Acromial osteophytes
Rotator cuff tears
Tendon fraying
should be documented.
The lateral portal is often useful for examining the bursal surface of the rotator cuff.
A probe can be introduced to assess:
Tendon continuity
Tear size
Tear depth
Tendon mobility
Tissue quality
Retraction
Attachment to the greater tuberosity
The arm can be internally and externally rotated to expose different regions of the cuff.
This examination is particularly important because some partial-thickness tears may not be fully appreciated from the articular surface alone.
The acromioclavicular joint may also be evaluated during subacromial arthroscopy when clinically indicated.
The distal clavicle can be partially obscured by thickened synovial or capsular tissue.
The surgeon evaluates:
Articular cartilage
Synovitis
Osteophytes
Joint degeneration
Distal clavicle pathology
The decision to perform distal clavicle procedures should be based on clinical symptoms and imaging rather than arthroscopic appearance alone.
After all planned diagnostic and therapeutic procedures are completed:
Remove arthroscopic instruments.
Remove cannulas.
Confirm hemostasis.
Irrigate the operative field as appropriate.
Close the portals with interrupted or subcuticular sutures.
Apply sterile dressings.
Place the arm in a sling when required by the procedure.
Postoperative immobilization should depend on the specific operation.
For example, rehabilitation after rotator cuff repair or labral stabilization is different from rehabilitation after diagnostic arthroscopy or simple debridement.
Several principles are particularly important.
The clavicle, acromion, scapular spine, AC joint, and coracoid should be clearly identified before draping obscures the landmarks.
Do not inspect only the suspected lesion. A complete examination reduces the risk of missing associated pathology.
Spinal needle localization can help optimize the trajectory and reduce unnecessary soft-tissue injury.
The anterior shoulder contains important neurovascular structures, while the posterior and inferior regions also require careful portal planning.
Traction should create adequate working space without unnecessary tension on peripheral nerves.
Important examples include:
Buford complex
Meniscoid superior labrum
Normal glenoid cartilage variations
Humeral head bare area
Variable glenohumeral ligaments
Failure to recognize these variants can result in unnecessary treatment.
The arthroscope, light source, camera, monitor, irrigation pump, shaver, and required implants should be tested before the procedure begins.
| Feature | Beach-Chair Position | Lateral Decubitus Position |
|---|---|---|
| Shoulder access | Good | Good |
| Posterior access | Good | Very good |
| Joint distraction | Usually less than lateral traction | Excellent |
| Arm mobility | High | Controlled by traction |
| Conversion to open surgery | Convenient | Possible |
| Traction-related risk | Lower | Requires careful monitoring |
| Cerebral perfusion considerations | Important | Less prominent |
| Common applications | Broad range of shoulder procedures | Arthroscopic instability and joint procedures |
Neither position is universally superior. Surgeon experience, procedure type, anesthesia considerations, and patient-specific factors should guide the choice.
The most commonly used portals are the posterior, anterior, and lateral portals. Additional accessory portals may be required depending on the procedure.
It is generally located approximately 2–3 cm inferior to the posterolateral corner of the acromion and slightly medial, in the soft spot over the posterior glenohumeral joint. Exact positioning should be individualized based on surface anatomy and the planned procedure.
The beach-chair position provides convenient access to the shoulder and allows relatively free arm movement, while the lateral decubitus position provides substantial joint distraction and can offer excellent visualization of the glenohumeral joint.
A complete examination should include the articular surfaces, subscapularis, rotator interval, glenohumeral ligaments, biceps tendon, superior and inferior labrum, rotator cuff, capsule, and posterior joint structures.
The drive-through sign describes unusually easy passage of the arthroscope between the humeral head and glenoid due to capsular laxity. It can support a diagnosis of shoulder instability when correlated with other clinical findings.
The Buford complex is an anatomical variant characterized by a cord-like middle glenohumeral ligament and absence or marked hypoplasia of the anterosuperior labrum. It should not automatically be mistaken for a pathological labral tear.
A 30° arthroscope provides a practical balance between field of view and orientation and is widely used for routine shoulder arthroscopy. A 70° scope may be useful in selected situations when additional visualization is required.
Shoulder arthroscopy is a highly versatile technique that requires more than simply inserting an arthroscope into the glenohumeral joint. Successful surgery depends on accurate positioning, careful portal placement, systematic diagnostic examination, familiarity with normal anatomical variants, and appropriate selection of arthroscopic instruments and implants.
The essential principles include:
Perform careful clinical and imaging assessment before surgery.
Select beach-chair or lateral decubitus positioning according to the procedure and patient.
Mark the major bony landmarks before establishing portals.
Establish the posterior portal carefully and confirm intra-articular access.
Create anterior and lateral portals under direct visualization when appropriate.
Perform a systematic glenohumeral examination rather than focusing only on the suspected lesion.
Evaluate the labrum, biceps, rotator cuff, cartilage, capsule, and glenohumeral ligaments.
Recognize normal anatomical variants such as the Buford complex and humeral head bare area.
Perform a complete subacromial examination when clinically indicated.
Match the postoperative rehabilitation protocol to the specific procedure performed.
For modern orthopedic surgery, high-quality arthroscopy depends on the combination of anatomical knowledge, appropriate visualization, reliable arthroscopy equipment, precise instruments, and disciplined surgical technique.


